Intro:
Congrats! You are about to write your first lab. The Keil project folder is provided below. By now, I hope you have read the “getting started” page. Lets write your first ARM program!
Files:
ARM_Junkie_Lab01_Blinking_LEDs.zip Blinking_Leds.hex
First off:
Power up your board using the correct AC adapter. Did you notice a preloaded program blinking the LEDs? Well, that’s no fun. The aim of this lab is to get you familiar with writing code for the ARM and downloading it to your board. So lets take this step-by-step. (After this lab, I won’t baby you so much, I PROMISE).
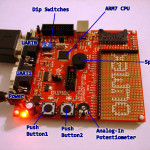
Plug your serial cable to the UART0 port.
Fig 1.1 – LPC2148 Lay Out
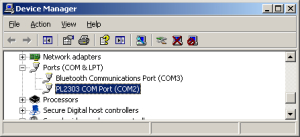
Plug the other end to your PC (most likely, through a Serial-to-USB adapter). Check your ‘Device Manager’ to see what COM port your ARM board is connected to. My Serial-to-USB adapter has registered itself as COM Port 2. Now enter that tidbit of information into Flash Magic and match the following configuration.
Fig 1.2 – Device Manager
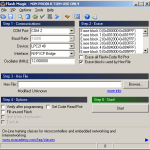
Fig 1.3 – Flash Magic Setup config
COM Port:2, Baud Rate: 19200, Device: LPC2148, Interface: NXP ICP Bridge, Oscillator(MHz): 12. Make sure you set your COM Port correctly to your machine. Everything else should match my configuration. Once Flash Magic is correctly set up, you should save this configuration. File>’Save Settings’. This way, the only entry you will have to set is the hex file location for future labs.
VERY IMPORTANT: Make sure your ARM board is plugged in to your PC, and that the blue DIP switches are flipped to the ON side.
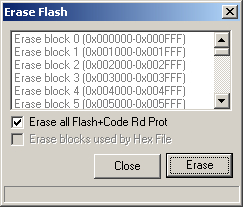
In Flash Magic, goto ISP>Erase Flash. Check the box ‘Erase all Flash+Code Rd Prot’ and Click ‘Erase’. Now your preloaded program is erased.
Fig 1.4 – Erase Flash
Setting Up Keil
Open up Keil uVision. We are going to start a new project. Goto File>New>uVision Project. Pick a location and a name to save your new project. I named my project ‘Blinking_Leds.uv2’ with a directory titled ‘ARM_Junkie_Lab01_Blinking_LEDs’.
Keil will then ask you to select a Target. Vendor: NXP, device: LPC2148.
Fig 1.5 – Select Target Device
You will be prompted if you would like ‘startup code’ added to your project. Click Yes, I will show you how to configure this later on.
Now you have a blank project in Keil. Time to add in the ‘main’ file and start writing code 🙂
File>New>File. Save this file as ‘main.c‘. As it stands, this file has not been added to your project. Right-Click on the ‘Source Group 1‘ directory in the Project Workspace window on the right-hand side. Left-Click on ‘Add Files to Group ‘Source Group 1‘ and select the main.c file. After you add this file, click ‘Close‘ to stop adding source files.
Fig 1.6 – Add source to project
Now the file is added and we can start writing some code!!!!
Writing Some Code
First things first. The ARM CPU needs to be ‘set up’ properly to function. This is where a lot of people start getting scared off. I know you guys are used to have your MCUs (such as the 8051) just start executing code right off the bat. Well, the ARM is a little bit more sophisticated. Most of the ‘set up’ has to do with setting the CPU’s clock frequency and peripheral clock frequencies. Keil can do this for you, or at least, make it eassier to set and change. (The Keil startup code does other things which are important, but we will skip that for now)
Initializing the ARM CPU
The Olimex LPC2148 board has a 12Mhz oscillator. You may run your ARM board at multiples of this oscillator. I operate my board at 60Mhz (the fastest you can run this board at) and with the Peripheral clock (pclk) at the same speed as the System clock (cclk). Knowing your correct clockspeed becomes a factor in later labs with timings, i.e. UART Communications.
For a full understanding you will need to consult your LPC2148 Manual. This explanation, provided by Hitex, is simple enough to follow for now.
[code]
Setting the Phased Lock Loop (PLL)
———————————-
Olimex LPC-H2148 has a 12.00 mhz crystal
We’d like the LPC2148 to run at 60 mhz
(has to be an even multiple of crystal)
According to the Philips LPC2148 manual:
M = cclk / Fosc
where: M = PLL multiplier (bits 0-4 of PLLCFG)
cclk = 60000000 hz
Fosc = 12000000 hz
Solving:
M = 60000000 / 12000000 = 5
M = 5.0 (round up when needed)
Note: M – 1 must be entered into bits 0-4 of PLLCFG
(assign 4 to these bits)
The Current Controlled Oscilator (CCO) must operate in the
range 156 mhz to 320 mhz
According to the Philips LPC2148 manual:
Fcco = cclk * 2 * P
where: Fcco = CCO frequency
cclk = 60000000 hz
P = PLL divisor (bits 5-6 of PLLCFG)
Solving:
Fcco = 60000000 * 2 * P
P = 2 (trial value)
Fcco = 60000000 * 2 * 2
Fcc0 = 24000000 hz (good choice for P since it’s within
the 156 mhz to 320 mhz range)
P must have one of the values 1, 2, 4, or 8. The value written to
the PSEL bits in PLLCFG is 00 for P = 1; 01 for P = 2; 10 for P = 4;
11 for P = 8
P = 2, PLLCFG bits 5-6 = 1 (assign 1 to these bits)
Finally:
PLLCFG = 0 01 00100 = 0x24
[/code]
Because we are not modifying these values in code, we don’t have to worry about these registers. However, I should mention that there is a special way of writing to the PLLCFG register. To load the PLLCFG register, we must use a 0xAA followed by a 0x55 write sequence to the PLLFEED register. But because we are letting Keil do this for us, we don’t have to worry about these details.
The important part to take away from this section is to know that we want the the Peripheral clock (pclk) and the external memory bus clock (xclk) at the same speed as the System clock (cclk). From the calculations above: M=5, and P=2.
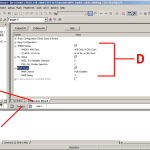
To change these fields within Keil’s generated startup code, double -click on the Startup.s file (Fig 1.7-A), you are now in the Startup.s tab (Fig 1.7-B), click to the Configuration Wizard subtab (Fig 1.7-C). Now make the needed configuration settings (Fig 1.7-D). Keil will now insert the necessary ‘startup’ code in the beginning of your project. Easy peasy.
Fig 1.7 Startup Configuration Wizard
Okay, moving on…
Code!
Open your main.c file. Include the LPC214X.h header file. This file contains all the register locations for your ARM chip. Now you can refer to these registers by name instead of memory locations.
/*******************************************************************************
        Header files
*******************************************************************************/
#include "LPC214x.h"
Now we start the main function and do our thang.
/*******************************************************************************
        MAIN
*******************************************************************************/
int	main (void) {
     // for loop variable declaration
     int j;
The LEDs on the LPC2148 board are right above the pushbuttons. LED1 is connected to Port 0.10, LED2 is connected to Port 0.11. How do I know this? Thats because I checked the Schematic (Fig 1.8)
Fig 1.8 Olimex LPC2148 Schematic
These LEDs are connected to 3.3v, this means you need to “ground” these pins to complete the circuit . So setting the logic ‘LOW’ on these pins will turn these LEDs ON.
First we need to designate these pins as OUTPUTS. We do that with modifying the IO Direction Register in the following line of code.
     // P0.10, P0.11 output
     IODIR0 = 0x00000c00;
Now we write the endless while loop. In this loop you first delay sometime, turn OFF one LED, turn ON the other LED, delay again, toggle the LEDs, and wash, rinse, repeat. IOSETx sets the pin HIGH, IOCLRx clears the pin LOW. I know my delays are rather weak in this example but its all you need to get started. More sophisticated delays await in future labs.
     // endless loop to toggle the two leds
     while (1) {
          for (j = 0; j < 1000000; j++ )
          {
               ;//Delay Loop
          }
          //Turn OFF Right LED
          IOSET0 = 0x00000800;
          //Turn ON Left LED
          IOCLR0 = 0x00000400;
          for (j = 0; j < 1000000; j++ )
          {
               ;//Delay Loop
          }
          //Turn OFF Left LED
          IOSET0 = 0x00000400;
          //Turn ON Right LED
          IOCLR0 = 0x00000800;
     }
I know I didn’t cover the IODIR0, IOSET0, IOCLR0, registers in great detail. I expect you can open up the ARM7 manual and look for the tidbits of importance. Basically, each bit controls a pin. There are also PINSEL0/1 registers to worry about as well, but because we are just using General Purpose IO Pins (GPIO) then we didn’t have to modify these registers.
Lets look at this code pieced together:
/*******************************************************************************
        Header files
*******************************************************************************/
#include "LPC214x.h"

/*******************************************************************************
        MAIN
*******************************************************************************/
int	main (void) {
     // for loop variable declaration
     int j;

     // P0.10, P0.11 output
     IODIR0 = 0x00000c00;

     // endless loop to toggle the two leds
     while (1) {
          for (j = 0; j < 1000000; j++ )
          {
               ;//Delay Loop
          }
          //Turn OFF Right LED
          IOSET0 = 0x00000800;
          //Turn ON Left LED
          IOCLR0 = 0x00000400;
          for (j = 0; j < 1000000; j++ )
          {
               ;//Delay Loop
          }
          //Turn OFF Left LED
          IOSET0 = 0x00000400;
          //Turn ON Right LED
          IOCLR0 = 0x00000800;
     }

}
Not too shabby. Lets compile and check for errors. Project>Rebuild All Target Files. Nope, no errors. Did you get errors? That’s tough, good luck looking it up here. Oh I forgot one thing! We didn’t create a Hex file because we didn’t tell Keil to create one for us! In your Project Workspace window, select the Target 1 Folder. Make sure this is highlighted. Project>Options for Target ‘Target 1’. In this window click on the Output tab. Check the ‘Create HEX File’ box. Okay, re-compile your project again. There, a nice HEX file should be in your project directory.
Downloading HEX files to your board
We are almost done! Just gotta download the file to our board. Configure Flash Magic correctly if you haven’t done so already. Browse for the location of the HEX file Keil created. VERY IMPORTANT: Before hitting ‘Start’ make sure your ARM board is plugged in to your PC, and that the blue DIP switches are flipped to the ON side. (These DIP switches need to be OFF when you want to communicate through the UART, ON when you want to program the board.)
Okay, press the ‘Start’ button. Wait for it to download. Okay, now you should have your LEDs blinking. SUCCESS! What’s that you say? It doesn’t work? Did I screw up somewhere? Hmm. Let me know if you guys have problems to re-tool my tutorial. Otherwise I expect you to have a working lab01 like I do!
Conclusion and wrap up
I apologize for having a lengthy first tutorial. When I first started to learn about the ARM I was a bit intimidated. It’s nothing that a cool head, and patience can’t solve! Subsequent labs will be shorter and more directed at interfacing peripherals, devices, and protocols. Hope you enjoyed this first lab.
